Industry News
Federated multi-account access for AWS CodeCommit : idk.dev
As a developer working in a large enterprise or for a group that supports multiple products, you may often find yourself accessing Git repositories from different organizations. Currently, to securely access multiple Git repositories in other popular tools, you need SSH keys, GPG keys, a Git credential helper, and a significant amount of setup by…

As a developer working in a large enterprise or for a group that supports multiple products, you may often find yourself accessing Git repositories from different organizations. Currently, to securely access multiple Git repositories in other popular tools, you need SSH keys, GPG keys, a Git credential helper, and a significant amount of setup by the developer hoping to commit to the repository. In addition, administrators must be aware of the various ways to remove all the permissions granted to the developer.
AWS CodeCommit is a managed source control service. Combined with AWS Single Sign-On (AWS SSO) and git-remote-codecommit, you can quickly and easily switch between repositories owned by different groups or even managed in separate AWS accounts. You can control those permissions with AWS Identity and Access Management (IAM) roles to allow for the automated removal of the user’s permission as part of their off-boarding procedure for the company.
This post demonstrates how to grant access to various CodeCommit repositories without access keys.
Table of Contents
Solution overview
In this solution, the user’s access is controlled with federated login via AWS SSO. You can grant that access using AWS native authentication, which eliminates the need for a Git credential helper, SSH, and GPG keys. In addition, this allows the administrator to control access by adding or removing the user’s IAM role access.
The following diagram shows the code access pattern you can achieve by using AWS SSO and git-remote-codecommit to access CodeCommit across multiple accounts.
Prerequisites
To complete this tutorial, you must have the following prerequisites:
- CodeCommit repositories in two separate accounts. For instructions, see Create an AWS CodeCommit repository.
- AWS SSO set up to handle access federation. For instructions, see Enable AWS SSO.
- Python 3.6 or higher installed on the developer’s local machine. To download and install the latest version of Python, see the Python website.
- On a Mac, it can be difficult to ensure that you’re using Python 3.6, because 2.7 is installed and required by the OS. For more information about checking your version of Python, see the following GitHub repo.
- Git installed on your local machine. To download Git, see Git Downloads.
- PIP version 9.0.3 or higher installed on your local machine. For instructions, see Installation on the PIP website.
Configuring AWS SSO role permissions
As your first step, you should make sure each AWS SSO role has the correct permissions to access the CodeCommit repositories.
- On the AWS SSO console, choose AWS Accounts.
- On the Permissions Sets tab, choose Create permission set.
- On the Create a new permission set page, select Create a custom permission set.
- For Name, enter CodeCommitDeveloperAccess.
- For Description, enter This permission set gives the user access to work with CodeCommit for common developer tasks.
- For Session duration, choose 12 hours.

- For Relay state, leave blank.
- For What policies do you want to include in your permissions set?, select Create a custom permissions policy.
- Use the following policy:
{
    "Version": "2012-10-17",
    "Statement": [
        {
             "Sid": "CodeCommitDeveloperAccess",
             "Effect": "Allow",
             "Action": [
                 "codecommit:GitPull",
                 "codecommit:GitPush",
                 "codecommit:ListRepositories"
             ],
             "Resource": "*"
         }
      ]
}
The preceding code grants access to all the repositories in the account. You could limit to a specific list of repositories, if needed.
- Choose Create.
Creating your AWS SSO group
Next, we need to create the SSO Group we want to assign the permissions.
- On the AWS SSO console, choose Groups.
- Choose create group.
- For Group name, enter CodeCommitAccessGroup.
- For Description, enter Users assigned to this group will have access to work with CodeCommit.
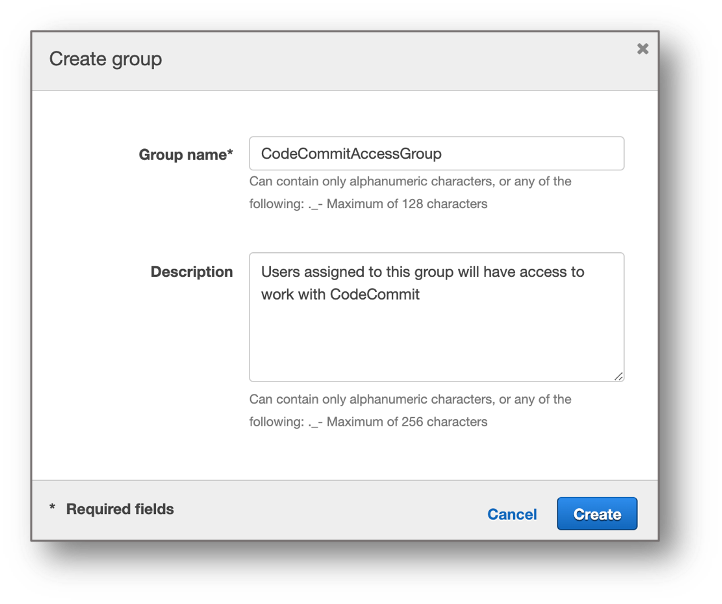
- Choose Create.
Assigning your group and permission sets to your accounts
Now that we have our group and permission sets created, we need to assign them to the accounts with the CodeCommit repositories.
- On the AWS SSO console, choose AWS Accounts.
- Choose the account you want to use in your new group.
- On the account Details page, choose Assign Users.
- On the Select users or groups page, choose Group.
- Select CodeCommitGroup.
- Choose NEXT: Permission Sets.
- Choose the CodeCommitDeveloperAccess permission set and choose Finish

- Choose Proceed to Accounts to return to the AWS SSO console.
- Repeat these steps for each account that has a CodeCommit repository.
Assigning a user to the group
To wrap up our AWS SSO configuration, we need to assign the user to the group.
- On the AWS SSO console, choose Groups.
- Choose CodeCommitAccessGroup.
- Choose Add user.
- Select all the users you want to add to this group.
- Choose Add user(s).
- From the navigation pane, choose Settings.
- Record the user portal URL to use later.
Enabling AWS SSO login
The second main feature we want to enable is AWS SSO login from the AWS Command Line Interface (AWS CLI) on our local machine.
- Run the following command from the AWS CLI. You need to enter the user portal URL from the previous step and tell the CLI what Region has your AWS SSO deployment. The following code example has AWS SSO deployed in us-east-1:
aws configure sso
SSO start URL [None]: https://my-sso-portal.awsapps.com/start
SSO region [None]:us-east-1
You’re redirected to your default browser.
- Sign in to AWS SSO.
When you return to the CLI, you must choose your account. See the following code:
There are 2 AWS accounts available to you.
> DeveloperResearch, [email protected] (123456789123)
DeveloperTrading, [email protected] (123456789444)
- Choose the account with your CodeCommit repository.
Next, you see the permissions sets available to you in the account you just picked. See the following code:
Using the account ID 123456789123
There are 2 roles available to you.
> ReadOnly
CodeCommitDeveloperAccess
- Choose the CodeCommitDeveloperAccess permissions.
You now see the options for the profile you’re creating for these AWS SSO permissions:
CLI default client Region [None]: us-west-2<ENTER>
CLI default output format [None]: json<ENTER>
CLI profile name [123456789011_ReadOnly]: DevResearch-profile<ENTER>- Repeat these steps for each AWS account you want to access.
For example, I create DevResearch-profile for my DeveloperResearch account and DevTrading-profile for the DeveloperTrading account.
Installing git-remote-codecommit
Finally, we want to install the recently released git-remote-codecommit and start working with our Git repositories.
- Install git-remote-codecommit with the following code:
pip install git-remote-codecommitWith some operating systems, you might need to run the following code instead:
sudo pip install git-remote-codecommit- Clone the code from one of your repositories. For this use case, my CodeCommit repository is named MyDemoRepo. See the following code:
git clone codecommit://DevResearch-profile@MyDemoRepo my-demo-repo- After that solution is cloned locally, you can copy code from another federated profile by simply changing to that profile and referencing the repository in that account named MyDemoRepo2. See the following code:
git clone codecommit://DevTrading-profile@MyDemoRepo2 my-demo-repo2Cleaning up
At the end of this tutorial, complete the following steps to undo the changes you made to your local system and AWS:
- On the AWS SSO console, remove the user from the group you created, so any future access requests fail.
- To remove the AWS SSO login profiles, open the local config file with your preferred tool and remove the profile.
- The config file is located at %UserProfile%/.aws/config for Windows and $HOME/.aws/config for Linux or Mac.
- To remove git-remote-codecommit, run the PIP uninstall command:
pip uninstall git-remote-codecommitWith some operating systems, you might need to run the following code instead:
sudo pip uninstall git-remote-codecommitConclusion
This post reviewed an approach to securely switch between repositories and work without concerns about one Git repository’s security credentials interfering with the other Git repository. User access is controlled by the permissions assigned to the profile via federated roles from AWS SSO. This allows for access control to CodeCommit without needing access keys.

Daily Financial News
What is the best crypto wallet ?

What is the best crypto wallet: a hardware wallet, a software wallet, or a mobile wallet?
In the early stages of learning how to use Bitcoin, the security question arises: how to ensure your coins remain in your possession? Only by generating and storing keys in a way that can be verified can you be certain. It is impossible to be sure no one else has a copy of your keys unless you know they were created properly and stored offline.
Hardware wallets create your keys offline using a random number generator, so they cannot be logged. Additionally, the keys are kept permanently offline, so they cannot be accidentally shared on a network.
In software wallets and mobile wallets, random number generators are often built into the device the wallet is installed on. Since they use inputs like the current time to calculate randomness, they are difficult to verify and generally not secure. Even if your device generates randomness in a secure manner, host the resulting keys on a networked device, and an attacker can extract, view, or intercept them at any time.
It is transparent to verify that open-source hardware wallets create and store randomness securely, and that your keys are kept offline while being protected from threats like phishing. It is different in the case of open-source Bitcoin wallet though.
In addition to protecting against other vulnerabilities, hardware wallets resolve new attacks both progressively and reactively among security researchers. Supporting bug bounty programs ensures that all types of security issues are regularly checked.

What is the best crypto wallet_ a hardware wallet, a software wallet, or a mobile wallet_
Stay more secure everywhere
Hardware wallets have set a new standard for universal cybersecurity, as we discussed above. According to speculators, the future of the internet – dubbed Web3 – will rely on cryptographically secure keys backed up physically. In the cryptosphere, as well as in everyday business, e-commerce, and social media, hardware wallets are essential.
Your assets and identity are both protected offline when you use a hardware wallet for authentication, so there is no counterparty risk.
As a result of forgetting passwords and changing authenticator devices, security has long relied on third parties. Using the open recovery seed standard, users can backup their accounts safely without relying on a third party and recover accounts from any compatible device. Using Shamir backup, the recovery seed is split into multiple equal parts for stronger security.
Keeping in mind that not just crypto can be targeted is important. Similarly, your data can be leaked, resulting in phishing attacks, hostage situations, or compromised devices arriving by mail.
It has become easier and more affordable for everyone to have verifiable security thanks to hardware wallets.
The base layer of crypto security is hardware wallets
By bridging the digital and physical worlds, hardware wallets create digital keys offline and keep them safe. Crypto assets can be controlled with the keys in many ways, such as two-factor authentication, digital signatures, or two-factor authentication.
With open standards, you can ensure the same level of security across any app you use. As a result, dozens of hardware wallet manufacturers have appeared around the world, accelerating the adoption of crypto security and ensuring standards are maintained to ensure your coins remain yours regardless of wallet.
Industry News
School4Trading Review – How to Spot Possible Forex Broker Fraud

School4Trading Review – How to Spot Possible Forex Broker Fraud
In this School4trading Review, we will look at the features of the software, as well as the customer support. First, let us look at the interface. The design is simple and easy to navigate. It also provides a chatbot, which helps you to communicate with the broker. The customer service is warm and inviting, which is a hallmark of a good broker. In contrast, a fraudulent broker will use cold and impersonal customer support to lure people in.
Another problem with the system is that the login process is not always intuitive. You may have to retype your password several times to get in. Then, you may experience difficulties withdrawing your funds or accessing your account. In such cases, you might have to wait for days or even weeks before you can withdraw the money you’ve invested. This is not a good sign. It’s better to choose a different trading platform altogether.
If you’re having trouble logging in, you should also check the legitimacy of the broker. Whether the broker is licensed by a reliable regulatory body or closed down, you’ll want to be sure it’s legitimate. If the broker isn’t licensed by the right body, don’t trust him. You shouldn’t waste your time with an inexperienced company. This will only cause you problems in the long run.
The next factor that should be checked is the licensing. A legitimate broker will have a license from a high regulatory body. However, a broker without a license will be unreliable. Moreover, a reliable regulator will take away the license of a scam broker. As a result, a trustworthy School4Broker/Profittrade review should mention fees, account rules, and contract terms. A scam broker will be unable to operate legally.
Secondly, look for warning signs. The broker should be licensed and regulated by a reliable regulatory body. It should be regulated by a high level. If it doesn’t, it’s a scam. Lastly, it should have a website that lets you easily access your account. Moreover, you should not hesitate to check the contact information. If you find any information that seems suspicious, you should reconsider using the broker.
In summary, Forex trading isn’t easy, but it doesn’t have to be complicated. It’s not as difficult as it seems if you’ve heard about the program. You’ll learn everything about the basics and how to become a professional. But if you’re still unsure about whether this program is right for you, don’t hesitate to contact a school4trading’s website.
The most important thing to remember when it comes to Forex trading is that it’s not easy. While it’s important to have a strong background in trading, there are a number of factors that can affect your success. Having a proper plan is vital in the long run, because you will be trading with real money. And, the platform should be reliable. Otherwise, you’ll end up losing a lot of money.
As we’ve mentioned, Forex is not easy. Investing isn’t something you can do in the comfort of your own home. You need a proven system. There are no free trials, so you’ll have to find a way to do it yourself. This isn’t a scam, and it’s a great way to make money without any help. A Forex system can help you learn the intricacies of the market.
Although the process of learning Forex isn’t an easy one, it’s certainly not impossible. Fortunately, there are many people who are willing to take the time to learn how to trade. But, even the most experienced trader needs to be aware of the risks of the market. While Forex trading isn’t easy, it can be done with the right knowledge. The software’s user-friendly interface is key.
Daily Financial News
Don’t Count On JPY Correction; Staying Long GBP/JPY

The path of the potential pace of the JPY decline may still be underestimated by markets, which continue trading the JPY long.
While the 10% USDJPY advance from September lows looks impressive from a momentum point of view, it may no thave been driven by Japan’s institutional investors reducing their hedging ratios or Japan’s household sector reestablishing carry trades.
Instead, investors seemed to have been caught on the wrong foot, concerned about a sudden decline of risk appetite or the incoming US administration being focused on trade issues and not on spending. Spending requires funding and indeed the President-elect Trump’s team appears to be focused on funding. Here are a few examples: Reducing corporate taxation may pave the way for US corporates repatriating some of their USD2.6trn accumulated foreign profits. Cutting bank regulation could increase the risk-absorbing capacity within bank balance sheets. Hence, funding conditions – including for the sovereign – might generally ease. De-regulating the oil sector would help the trade balance, slowing the anticipated increase in the US current account deficit. The US current account deficit presently runs at 2.6% of GDP, which is below worrisome levels. Should the incoming government push for early trade restrictions, reaction (including Asian sovereigns reducing their holdings) could increase US funding costs, which runs against the interest of the Trump team.
Instead of counting on risk aversion to stop the JPY depreciation, we expect nominal yield differentials and the Fed moderately hiking rates to unleash capital outflows from Japan.The yield differential argumenthas become more compelling with the BoJ turning into yield curve managers. Via this policy move, rising inflation rates push JPY real rates and yields lower, which will weaken the JPY. Exhibit 12 shows how much Japan’s labor market conditions have tightened. A minor surge in corporate profitability may now be sufficient, pushing Japan wages up and implicity real yields lower.
JPY dynamics are diametrical to last year . Last year, the JGB’s “exhausted”yield curve left the BoJ without a tool to push real yields low enough to adequately address the weakened nominal GDP outlook. JPY remained artificially high at a time when the US opted for sharply lower real yields. USDJPY had to decline, triggering JPY bullish secondround effects via JPY-based financial institutions increasing their FX hedge ratios and Japan’s retail sector cutting its carry trade exposures. Now the opposite seems to be happening. The managed JGB curve suggests rising inflation expectations are driving Japan’s real yield lower. The Fed reluctantly hiking rates may keep risk appetite supported but increase USD hedging costs.Financial institutions reducinghedge ratios and Japan’s household sector piling back into the carry trade could provide secondround JPY weakening effects
Daily Financial News
Mexico raises interest rates, cites Trump as risk

MEXICO CITY – The head of Mexico’s central bank says U.S. Republican candidate Donald Trump represents a “hurricane” sized threat to Mexico.
Banco de Mexico Gov. Agustin Carstens told the Radio Formula network Friday that a Trump presidency “would be a hurricane and a particularly intense one if he fulfills what he has been saying in his campaign.”
Trump has proposed building a wall along the border and re-negotiating the North American Free Trade Agreement.
Mexico’s central bank raised its prime lending rate by half a percent to 4.75 percent Thursday, citing “nervousness surrounding the possible consequences of the U.S. elections, whose implications for Mexico could be particularly significant.”
Mexico’s peso had lost about 6 percent in value against the dollar since mid-August. It recovered slightly after the rate hike
Financial News
Africa’s first Fairtrade certified gold co-operative offers hope to gold miners living in poverty

Syanyonja Artisan Miners’ Alliance (SAMA) has become the first artisanal small scale mining co-operative in Africa to become Fairtrade certified, bringing much needed hope to impoverished communities who risk their lives to mine the rich gold seam that runs around Lake Victoria.
SAMA is one of nine previously informal groups from Uganda, Kenya and Tanzania which has benefitted from a pilot project launched by Fairtrade in 2013. This innovative program aims to extend the benefits of Fairtrade gold to artisanal miners across East Africa.
In that short time, SAMA has undergone training in business and entrepreneurship, as well as safe use of mercury, internal control systems, labour rights and better working conditions, health and safety and more. Previously, daily contact with toxic chemicals used to process gold meant members risked disease, premature births and even death. Fairtrade gold was first launched in 2011, and SAMA now joins Fairtrade certified gold mines MACDESA, AURELSA and SOTRAMI in Peru.
The co-operative produces just 5 kg gold per year, but nevertheless has the potential to significantly benefit many people in the local community through better conditions through certification. It is expected that Fairtrade and organizations like Cred Jewellery will support the miners, ensuring their gold can be refined and made available to jewellers in the UK and other markets.
Gonzaga Mungai, Gold Manager at Fairtrade Africa said: “This is a truly momentous and historical achievement and the realisation of a dream that is many years in the making. Gold production is an important source of income for people in rural economies. Congratulations to SAMA, it sets a precedent which shows that if groups like this can achieve certification, then it can work for others right across the African continent.”
The Fairtrade Gold Standard encourages better practice and changes to come in line with international regulation around the production and trade of so-called ‘conflict minerals’. Under the Standard, miners are required to:
- Uphold a human rights policy preventing war crimes, bribery, money laundering and child labour
- Clearly represent where the minerals were mined
- Minimise the risks of conflict minerals through robust risk assessments and collaboration across supply chains
- Report to buyers and trading partners regarding the risks of conflict minerals
Now in its second phase, the programme will focus on supporting other mining groups in the region to access affordable loans and explore a phased approach to accessing the Fairtrade market, allowing more mining co-operatives across Africa to participate in the programme.
Gonzaga added: “Sourcing African metals from smallscale miners in the Great Lakes Region is the responsible thing to do. For a long time companies have avoided buying gold from this region, with devastating consequences for impoverished communities who were already struggling. It has driven trade deeper underground, as unscrupulous buyers pay lower prices and launder illegal gold into legitimate supply chains. That’s why we have chosen to work with these groups to help them earn more from their gold within a robust compliance system that offers social, environmental, and economic protections.”
The Fairtrade gold programme offers a small but scalable solution to sustainable sourcing of gold from the region in line with Section 1502 of the Dodd-Frank Act in the US, OECD Due Diligence Guidance and recent EU Supply-Chain Due Diligence proposals which could come into effect in 2016. This means that up to 880,000 EU firms that use tin, tungsten, tantalum and gold in manufacturing consumer products could be obliged to provide information on steps they have taken to identify and address risks in their supply chains for so-called ‘conflict minerals’.
Daily Financial News
Czech Aug Industrial Production Rebounds Sharply

Czech industrial production surged in August, after falling sharply in the previous month, figures from the Czech Statistical Office showed Friday.
Industrial production expanded 13.1 percent year-over-year in August, reversing a 14.1 percent plunge in July. That was well above the 8.3 percent climb expected by economists.
On a working-day-adjusted basis, industrial production advanced 7.7 percent in August from a year ago.
Manufacturing production grew 16.6 percent, while mining and quarrying output declined by 4.6 percent.
Month-on-month, industrial production increased a seasonally adjusted 12.1 percent in August.
Separately, the statistical office revealed that construction output decreased 5.9 percent yearly in August, following a 16.3 percent slump in the prior month. Compared to July, construction output gained 0.8 percent
Daily Financial News
New Zealand’s first Fairtrade Climate Neutral Coffee
Fairtrade have launched New Zealand’s first climate neutral coffee, which not only helps fight climate change, but also supports communities in developing countries. In partnership with Countdown, the Climate Neutral Coffee is exclusively available at Countdown as part of their Macro brand.
Fairtrade Climate Neutral Coffee means that the coffee production, from the farm right through to the supermarket shelf, has no negative impact on the climate. To achieve this, all participants in the supply chain first work to reduce their emissions and then offset the remaining emissions through the purchase of carbon credits from Fairtrade coffee farmers.
The carbon credits are generated by climate projects in Fairtrade farming communities, such as reforestation projects in Peru, the country where the coffee originates. These initiatives help Fairtrade farmers not only to combat the impact of climate change but also to earn additional income from the sale of their carbon credits.
Countdown partnered with Fairtrade Australia & New Zealand to develop the Climate Neutral Coffee exclusively for their Macro Organic range. The innovative product maintains Countdowns commitment to providing great quality products, while also helping to minimise their impacts on the environment.
James Walker, Countdown General Manager of Corporate Affairs says, “We’re pleased to extend our range of Fairtrade certified products, and be the first to launch a Climate Neutral Coffee in New Zealand.
“Demand for certified products continues to increase and this launch showcases our commitment to providing ethical and sustainable choices to our customers. The range is not only quality Arabica coffee, but it is also organic, Fairtrade certified and Climate Neutral.”
“With stores all around New Zealand, doing our bit to reduce our carbon footprint and operate sustainably is something the Countdown team is passionate about. In June this year we won the Ministry for the Environment’s Green Ribbon award in the ‘Resilience to Climate Change’ category for our work in increasing our energy efficiency and reducing our carbon emissions. We are actively working to improve how we do business to reduce the impact we have on the environment.
Molly Harriss Olson, CEO of Fairtrade New Zealand says, “We applaud Countdown for being a market leader in sustainability and are proud to partner with them on this innovative range. By choosing Fairtrade products, consumers are supporting a global system which is empowering and enabling 1.65 million farmers in 74 countries to adapt to climate change,” says Mr Walker.
“What makes Macro Fairtrade Climate Neutral Coffee truly unique is that the carbon compensation also takes place in the Fairtrade coffee supply chain. This means that Fairtrade farmers and their communities are benefitting from a fair price for their coffee as well as additional income from the carbon credits.”
All Fairtrade Carbon Credits are certified by Gold Standard, an organisation specialising in climate security and sustainable development. Gold Standard works to maximise the impact of climate and development interventions by creating robust standards for responsible management of the planet’s resources. Together Fairtrade and Gold Standard are uniquely placed to play a part in the global response to climate change
Daily Financial News
ECB Minutes show no indication of exit discussion – MUFG

Derek Halpenny, European Head of GMR at MUFG, suggests that the release of the minutes from the September ECB policy meeting were pretty clear with the focus still very much on ensuring continued monetary stimulus.
Key Quotes
“The minutes stated that “there should be no doubt” that the Governing Council is determined to execute asset purchases and also emphasised that it would adopt further measures as required to reach its price stability goal. The minutes also showed that the Governing Council felt it was “crucial” to maintain the high level of monetary accommodation.
Add to that, we had comments yesterday from key ECB Council members to emphasise the maintenance of the current stance. Executive Board member Praet stated that recovery would stall if stimulus was removed prematurely while Constancio was more direct stating that the report on the ECB nearing a taper consensus was simply not correct.
So the stance of the ECB is unlikely to change and we maintain that the ECB will extend QE in December at the current pace with alterations recommended by staff committees allowing for an extension. While that in itself might not drive the euro weaker, it certainly limits the upside as we move toward that key meeting in December.”
Industry News
Forex.com Review – How Legit And Reliable Is This Broker
Forex.com was established in 2001, as an online forex broker with an active presence in over 183 countries across the world. The brand is owned by Gain Capital, which is listed on the New York Stock Exchange (NYSE). The company’s headquarters is in Bedminster, New Jersey and it is regulated by top tier financial regulatory…

Table of Contents
Forex.com Review – How Legit And Reliable Is This Broker
Forex.com was established in 2001, as an online forex broker with an active presence in over 183 countries across the world. The brand is owned by Gain Capital, which is listed on the New York Stock Exchange (NYSE). The company’s headquarters is in Bedminster, New Jersey and it is regulated by top tier financial regulatory agencies across the globe including the CFTC in the U.S, the UK’s FCA, and Australia’s ASIC.
The firm offers clients 84 currency pairs, 8 cryptocurrencies, 17 indices, 26 commodities and 270+ stock CFDs. It supports margin trading with a maximum leverage of 20:1 for stocks and 50:1 for all other financial instruments.
In this review, we dig deep into its operations informed by its past and present client comments. We detail and rate each of the tradable financial assets offered as well as rating the quality of their services including customer support, trading fees, trading platforms, and account types.
Our goal is to help answer all your queries regarding its legitimacy and the safety of your funds to help you decide whether to open an account with them or not.
Strengths
- Provides traders with an expansive range of tradable instruments
- Features a huge selection of education and research materials
- Supports multiple trading platforms including MetaTrader and WebTrader
- Allows traders to choose between standard and commission accounts
- Boasts of relatively low trading fees compared to its US peers
Weaknesses
- The maximum leverage isn’t available for all traded instruments
- Its WebTrader platform if fairly rigid and not easily customizable
- Trading platform features limited fundamental analysis tools
- Doesn’t support spread betting and binary options for futures traders
What can you trade?
$50
Min Deposit
Good
App Support
1:30
Max Leverage
With regards to Forex trading, you have access to 84 currency pairs, which is more than you would get elsewhere. You get to trade all the major pairs, many more minor pairs, and a tad more exotic pairs than you would with its competitors.
When it comes to forex trading fees, the company has relatively expensive spreads. The EUR/USD pair, for instance, has an average spread of 1.3 on the standard account that is dependent on factors such as market volatility and liquidity. There also the commission-based trader accounts where spreads start from as low as 0.2 but attract a $5 commission for every $100k traded.
You also get access to margin-based foreign exchange trading for currencies. The rates are however dependent on your geographical location and local regulations. The U.S and international clients, for instance, have access to the entire 50:1 leverage, while UK traders can only use maximum leverage of 30:1 as directed by the FCA.
You can start trading with as little as $50 where the minimum traded lot is currently set at 1,000.
$50
Min Deposit
Mid
App Support
1:30
Max Leverage
Due to regulatory restrictions, Forex.com doesn’t offer this service to its U.S clients due to regulations. However, Canadian, U.K, and international clients have access to the 4500+ CFDs available for trading. These are primarily drawn from the global indices, shares and stocks, as well as commodities and cryptos.
The company has made most of these assets available to international clients on both the MetaTrader and WebTrader platforms. The market analysis section of their website features a fairly detailed economic calendar. You can also access the latest research and pivot points as well as popular topics and thought leaders’ views.
Traders can also opt to design individual automated trading algorithms on the platform or integrate third-party automated tools.
You also get access to the commodities markets through the spot metals CFDs on gold and silver. These commodities are only available on the WebTrader and not on the MetaTrader platform.
With regards to trading the commodities, you can speculate on their price appreciation or depreciation by taking trades in either direction. The precious metal traders also gain insights regarding the assets from the market analysis page.
$500
Min Deposit
Mid
App Support
1:30
Max Leverage
You can trade futures and futures options contracts as there is a platform through which you can invest in such products. U.S clients can also trade these instruments via
There is also a 14-day demo trading account for clients who would like to try trading the futures and futures options contracts. The simulated trading account is loaded with $50,000 virtual cash and contains all the key trading features like ultra-fast execution speeds and live market data.
What did our traders think after reviewing the key criteria?
The are three primary types of trading fees – all of which are volume-based and tied to different account types. These include pure spreads, spread plus fixed commission, and spread plus variable commission. The spreads, though competitive, are variable and are highly dependent on liquidity and the prevailing market conditions.
The pure spread account is popular with retail traders and spreads for the major currencies start from 1.0 with an average of 1.3 pips. The spread and fixed-rate commission account has lower spreads that start from 0.2 pips in addition to the $5 fixed commission for every $100k traded. The direct market access trader account fees start from 0.1 pips plus a variable commission that averages $60 for every $1 million traded.
With regards to discounts on fees, you get a cash rebate program that is pegged on the volume of trades. It also offers cash rebates of up to $9 for every million traded on the retail standard account, $9 for every million traded on the commission account and $20 per million traded on the high volume and direct market access account.
Non-trading fees include the rollover fees charged on trades that remain open at the end of the day’s trading session – 5 pm ET. Traders on the platform get to earn or pay these rollover rates based on whether they were long or short a trade.
Clients have access to three primary live trading account types, which include: the standard account, the commission account and the direct market account. There are also free demo accounts on offer that you can use to trade both Forex and futures contracts. The demo accounts come loaded $50,000 in virtual trading capital and are valid for 14 days.
The Standard Account
The standard account is accessible on both WebTrader and the MetaTrader trading interfaces. It calls for a $50 minimum deposit and attracts wholly variable trading fees where the spreads average 1.0 pips for the popular EUR/USD pair. Standard account holders subscribed to its Active Trader Program also get to earn up to 18% cash rebates.
The Commission Account
The Commission account stands out because it employs both variable spreads and fixed commissions in the determination of trading fees. Spreads on the account start from 0.2 pips with the fixed commission set at $5 for every $100k traded. The minimum deposit amount is $50 and the account is only available on the Webtrader and mobile apps and not on MetaTrader.
Direct Market Access Account
The direct market access account is specifically designed for high volume and frequent traders. Trading fees are a mix of variable spreads that start from 0.1 pips for major pairs and a variable commission starting from $60 for every million traded. The minimum account operating balance is set at $100K but traders are advised to maintain not less than $250K in their accounts. The DMA account is also not available on the MetaTrader interface.
There are no Sharia-compliant trading accounts, which are synonymous with the absence of overnight/rollover fees.
The firm supports several major trading interfaces including the MetaTrader (MT4), in-house trading platforms, Ninja trader, and API connections.

However, you can only access the standard forex trading account on the MT4 and Ninjatrader platforms. The two other accounts offeredare only accessible via the proprietary trading platform, which is available as a web trader, desktop app, and mobile app.
Our reviewers found the website well organized and easy to use with the home page featuring all the important tabs needed for fast and easy navigation. These include the signup and login tabs for new and existing clients as well as the markets, services, about us, platforms, market analysis, education and support tabs for everyone else looking for more insights. There also is a search tab where you can key in direct queries for even faster navigation.
The firm provides 24/5 customer support but doesn’t offer a live chat function on its website. However, its clients can access the support team on the telephone and via text messages, or through the different social media pages, and email. The website also features a detailed FAQ section.
There are four key payment options supported, which include:
- Debit card payments: it does not support credit card payments but processes debit card transactions for both Visa and MasterCard branded cards. The minimum deposit for debit cards is set at $50 and the maximum at $10,000. You can deposit in USD, EUR, and GBP currencies but all these are automatically converted to USD. processing of deposits is near-instant and free.
Debit card withdrawals have an estimated wait time of 24 hours. They do not attract processing fee but have a per transaction limit of $50,000.
- Bank wire transfers: you can make deposits in up to seven different currencies when it comes to bank wire deposits that must then be converted to USD. There is no minimum or maximum deposit limits for bank transfers. It may take up to two business days for the transfer to reflect in your trading account and there is no processing fees in addition to those charged by your bank.
Bank Wire withdrawals have an estimated wait time of 48 hours. There is no withdrawal limit but attract a $25 fee per transaction for amounts above $10,000.
- eCheck: they also accept eCheck payments. The minimum deposit is $50 with the maximum set at $10,000. Transaction processing is immediate and free.
eCheck withdrawals have an estimated wait time of 24 hours, don’t attract processing fees and have a withdrawal limit of $25K per transaction.
- Personal or business check: You can also fund your account using both personal and business checks. There are no minimum or maximum limits on deposits and transaction processing is free. Traders might, however, wait for up to 10 business days after the day of receiving the check for the cash to reflect in their accounts.
Personal or business check withdrawals are available with wait times of 48 hours. These are free and there are no maximum withdrawal limits.
There are no running promotions or bonus offers available at the moment, except for the cash rebate program available to its Active Trader Program clients.
The brand is owned by GAIN Capital Group, which is a public company headquartered in Bedminster, NJ, and is registered with and regulated by financial regulatory agencies such as the Futures Market commission (FMC), the National Futures Association (NFA), the Retail Foreign Exchange Dealer (RFED), and the Commodities Futures Trading Commission (CFTC).
As for deposit protection, there is no evidence of brand insuring customer deposits with the FDIC. GAIN Capital claims that it maintains a separate account for their customer funds while adding that these funds are then “distributed across a global network of custodian banks and brokers.”
The firm was established in 2001 and has over the years won several awards and global recognition. For instance, in Feb 2001, Forex.com was named the Forbes “Best of the Web” by Forbes.com before being named the “Best Online FX Trading Platform” for the year 2001 by Global Finance later that year. Others include being voted the Best Forex Broker in the USA for 2013 by the FT and Investors Chronicle magazine the same year.

Forex.com FAQs
Forex.com is the trademark of Gain Capital UK, Limited, a market-making broker incorporated in England and Wales. As a market-making broker, Forex.com is fully accountable for all client orders. Besides, the CFD broker reduces a client’s credit exposure by executing back to back positions with LCH. Clearnet, a Central Counterparty Clearinghouse.
Forex.com is not an ECN broker but provides Direct Markets Access (DMA) to traders looking for deep liquidity. The primary difference between ECN and DMA is that while ECN electronically matches buyers and sellers without the intervention of a third party, DMA brokers make individual contracts with liquidity providers. The features of the Forex.com DMA Account include access to level-II pricing, spreads from 0.1 on all markets and the option to split the spread.
Retail clients residing in the UK and the EU come under stringent regulations that limit their max leverage to 30:1. To qualify for lower margins or higher leverage, you could register as a professional client if you meet the eligibility criteria set by the regulators. You can change your leverage by filling out the margin change request form and submitting it to [email protected]
To connect Forex.com to MT4, you have to first register with the CFD broker. Next, check for a welcome email from Forex.com, which would also include your MT4 log in credentials and a link to download the platform. Download the desktop application on your computer or Android, iOS mobile device and start using the cutting-edge platform from MetaQuotes.
Industry News
A united Britain was victorious in war – but fallacies about the interwar peace persist
THE REPUTATION of the interwar period but especially of the 1930s as the decade of the slump and appeasement has done untold damage to British self-confidence ever since. It was a period during which supposedly a prosperous world power became economically second-rate, a weakling in international affairs and lost its place as a top-rank power.…

THE REPUTATION of the interwar period but especially of the 1930s as the decade of the slump and appeasement has done untold damage to British self-confidence ever since. It was a period during which supposedly a prosperous world power became economically second-rate, a weakling in international affairs and lost its place as a top-rank power. None of this was true.
Germany and the USA suffered worse depressions than we did, as did France in the later 1930s. France and the USA were greater appeasers than the United Kingdom. Moreover, large parts of the economy by 1939 were booming. To quote A.J.P. Taylor: if the 1930s were the devil’s decade, “at the same time English people were enjoying a richer life than any previously known in the history of the world: longer holidays, shorter hours, higher wages. They had motor cars, cinemas, radio sets, electrical appliances.” Little wonder, there was no threat to democracy in Britain between the wars. None the less, the dreadful reputation of the Thirties has been exploited by the numerous exponents of the myth of national decline in the twentieth century – left-wingers and European federalists – to undermine British self-confidence. This myth has also served Scotland’s nationalists, so from now on this revisionist history of Scotland will set its story within the parameters of a revisionist history of Britain.
It cannot be denied of course that Britain, and Scotland within it, faced many challenges in the 1920s and 1930s. The First World War had killed off the old international economy and Britain’s place therein. The USA had become the world’s leading economic power and had taken over many British export markets. The Japanese had done so, too, in the Far East, India, China and the East Indies. After the war, too, countries like Canada and Australia began to industrialise with the result that there was less demand for British staples on which for example the Scottish economy depended. India, meanwhile, had gained control of her own tariffs and could levy these on British goods. Even demand for coal began to fall with the rise of petroleum-based transport. There was a post-war glut in shipping but also in primary products causing world prices to fall for countries which traditionally purchased British goods.
The British position regarding invisibles was also weakened. Ten percent of overseas assets had had to be sold off to help pay for the war and we had accumulated a large war debt with the United States. (While German war debts were later written off, the Americans refused to write off ours.) Britain lacked a surplus on current account throughout the 1930s and on her trading account throughout the whole interwar period. This meant she could not rebuild her overseas wealth. Finally, the 1925 return to the gold standard at $4.85 an ounce brought only deflation.
Even so industrial productivity grew between 1920 and 1929 at 2.8 per cent per annum and industrial productivity by 3.8 per cent. World War One had spurred on technical advances: motor cars, aircraft, advanced machine tools, chemicals, ball-bearings, leading to more applied science and standardisation in the new industries such as automobiles, electrical engineering, chemicals, paper and printing. Even staples became more efficient with an 18 per cent rise in productivity in coal between 1924 and 1930 and 25 per cent in iron and steel production between 1923 and 1930. And clearly the economy was changing. The old staples produced 42 per cent of export receipts in 1929 and the new industries only 8.2 per cent. By 1937 the corresponding figures were 37 per cent and 21 per cent. Other positive signs were that average growth in industrial production per annum during 1929-1937 saw Britain with 3.4 per cent, Germany with 3.0 per cent, France with minus 2.8 per cent and the USA with 0.4 per cent. The equivalent figures for the average growth in output per manhour per annum for the same period were: Britain 2.1 per cent, Germany 2.1 per cent, France 1.6 per cent and the USA 3.3 per cent. And in England from the mid-1930s there was a huge house-building programme.
The international economic situation was made even worse by the US stock market collapse in 1929, followed by the US Smoot-Hawley Act of 1930 which raised American tariffs by an average of 20 per cent at the same time that the US money supply was being cut by a third. A US depression inevitably followed. This meant that other countries would find it nigh impossible to export to the USA. In response, the British government did what it could in a very bad situation. In 1931 Britain left the gold standard and in the same year she introduced tariffs of her own as well as imperial preferences agreed with Commonwealth Dominions at Ottawa. The new – and very competent – Chancellor of the Exchequer, Neville Chamberlain, also created ‘cheap money’ by cutting bank rate from 6 per cent to 2 per cent.
Still, the economy was scarred by high unemployment. Between 1932 and 1935 over 2 million people on average were out of work and a peak figure of almost three million was reached in the winter of 1932-33. This was almost one quarter of the insured workforce. Moreover, those areas dependent on staple industries – Northern Ireland, South Wales, the North East of England and Lancashire and Central Scotland – became depressed and faced huge social and economic problems, even if they benefited from a certain amount of slum clearance, municipal building and relief schemes. Areas such as Jarrow, Gateshead, Motherwell and Greenock saw almost 75 per cent of insured workers out of work in 1932. Half a million Scots emigrated during the 1920s and every year between 1927 and 1939 Scottish unemployment was higher than the national average. In July 1933 it stood at 28 per cent compared to 16 per cent in England and Wales. On the other hand, a social survey of Oxford in 1938 could dismiss unemployment as “almost negligible”.
The truth, however, was that throughout the interwar period never less than 75 per cent of the UK workforce – and often considerably more – was in employment. And in the Midlands and South of England, new industries were creating new jobs. Welsh miners would flock to Slough, for example, where many other Welshmen had already found jobs. Scots on the other hand lived too far away from these new centres of light industry.
Several factors encouraged a rise in prosperity in the South. Wages fell by 2 per cent for those in work but prices by 10 per cent. This rise in real wages stimulated the purchase of all kinds of goods and investment in building societies. These latter investments rose from £88 million in 1920 to £711m in 1939. Houses were cheap and so were mortgage rates, so hence the private housing boom in Southern England and the Midlands. Moreover, these new houses had electricity and two thirds of all homes were ‘wired up’ by 1939. The great boost in electricity supply also furthered the sale of all sorts of new electric appliances – washing machines, Hoovers, fridges, radios and record players. It also boosted the electrification of suburban railways and the completion of the national grid. For some industries, indeed, the 1930s were years of unprecedented growth. Britain by 1937 was producing half a million motor cars a year at factories in Coventry, Luton, Oxford and London which employed a workforce of 400,000. Some 1.8 million people owned cars by 1937. Advances in petrochemicals meanwhile brought about the use of Bakelite in consumer goods and man-made fibres in clothing.
J.B. Priestly could describe England in the 1930s as a country of “arterial and by-pass roads, filling stations and factories that look like exhibition buildings, of great cinemas and dancing halls, bungalows with tiny garages, cocktail bars, Woolworths, motor coaches, wireless, hiking, factory girls looking like actresses, greyhound racing and dirt tracks, swimming pools and everything given away for cigarette coupons.” Orwell wrote in only slightly different terms of the poorer, working class areas in the North, although what he said also applied to Scotland: “It is quite likely that fish and chips, art-silk stockings, tinned salmon, cut-price chocolate (five two-ounce bars for sixpence), the movies, the radio, strong tea and the Football Pools have between them averted revolution.” He could have added dance halls, record players and popular magazines. The Frankfurt School of Marxists thought the same. Consumer goods, jazz, cinema and nylons gave the working class a “false consciousness” that capitalism worked.
Yet there were other reasons why the unemployed remained so passive. For a start in areas like Central Scotland the scale of unemployment was simply so massive that it seemed like an act of nature about which nothing could be done. More to the point, everyone was on the dole and could avoid starvation. There were even supplementary benefits for the worst off. Labour certainly had no ready solutions and only bothered to organise one demo in 1933. The trades unions were equally useless. They represented only employed workers anyway. Insofar as the radical Left had posed a challenge with the Red Clydesiders after 1918, their influence had died by the early twenties and any challenge from a united left collapsed with the defeat of the General Strike in 1926. It only lasted a week until the miners were deserted by their fellow trade unionists. Evidence for working class militancy or alienation is in any case hard to find.
The famous Jarrow March of 1936, for example, consisted of only two hundred men, was non-political and organised with the cooperation of the police; one marcher was expelled because he was a communist. On the eve of World War Two the Communist Party achieved its greatest membership – a mere 17,756 members. Even the British Union of Fascists (BUF) had achieved a peak of 40,000 active and non-active members in 1934. The country seemed content to follow a Conservative lead.
In 1932 supporters of the National Government won 533 seats to Labour’s 35. Even in 1924 in Scotland the Unionists had won 38 seats to Labour’s 27. Orwell conceded: “However much one must hate to admit it, it is almost certain that between 1931 and 1940, the National Government represented the will of the people.” And the leading British socialist intellectual of the time, G.D.H. Cole admitted: “Tory spokesmen are not talking sheer nonsense when they claim that the National Government has pulled Great Britain successfully through the greatest depression in history.”
This is the sixth part of the series, here are the others:
Part one – Mythology in the history of Anglo-Scots relations;
Part two – From Auld Alliance to creating the Union;
Part three – Scotland 1707-1914: The Union adjusts and consolidates;
Part four – A loyal Scotland fights for Britain: 1707-1918;
The Union survives the War and evolves: 1918-1938
Alan Sked was educated at Allan Glen’s School in Glasgow, before going on to study Modern and Medieval History at the University of Glasgow, followed by a DPhil in Modern History at Merton College, Oxford. Sked taught at the London School of Economics where he became a leading authority on the history of the Hapsburg Empire, also teaching US and modern intellectual history and the history of sex, race and slavery. Alan Sked is now Emeritus Professor of International History at the London School of Economics.
Portrait of Neville Chamberlain by Sir William Newenham Montague Orpen (1878-1931)


A Detailed Lovacrypto Review
Capitalix-It is a good choice in 2024?

Buycryptomarkets Review – top 75 Broker?

Equaledge Review – Demo Account – top 100 Broker ?

Forex Trading Knowledge Questions and Answers

Exallt Review – Demo Account – top 75 Broker ?

Lesson 2 – Pair characteristics (the majors and the crosses), Understanding Forex Pairs

Lesson 3 – Introduction to charting

Lesson 1 – What is Forex and how does It work
What is Price Action Trading and How to Use it
How to Recognize False Breakouts

NSFX Demo Account Review | 2018 Must Read |
 Videos Of interest4 years ago
Lesson 2 – Pair characteristics (the majors and the crosses), Understanding Forex Pairs
- Videos Of interest4 years ago
Lesson 3 – Introduction to charting
- Videos Of interest4 years ago
Lesson 1 – What is Forex and how does It work
- Videos Of interest4 years ago
What is Price Action Trading and How to Use it
- Videos Of interest4 years ago
How to Recognize False Breakouts
- Broker Reviews4 years ago
NSFX Demo Account Review | 2018 Must Read |
- Broker Reviews2 years ago
Stockscale io Review – Demo Account – top 100 Broker ?
- Broker news4 years ago
FX Broker ActivTrades Wins the “Le Fonti Forex Broker of the Year Award”
- Videos Of interest4 years ago
4 Things to Always Do Before You Start Trading
- Broker Reviews2 years ago
Trade.com Demo Account Review | Must Read |